Wednesday, December 26, 2012

Making Snowmen

Last Christmas I made 4 snowmen out of various supplies and bottles I had lying around.  I wish I had a photo of all of them but I didn't think to do that!  So here I have photos of my first one I ever made and the last one, made this year.  I got the idea at an art show and they were selling well (meaning, people were purchasing!)at $30 on up & I truly think mine look better, IF I can "toot my own horn".   This Christmas I only made one and of course I didn't think to take any photos as I was designing her.  I give them away as gifts as I think they are much to fragile to try to sell in my Etsy store.  I thought I could give you some instruction so if your interested in doing some for next year you can start collecting supplies. Right now the Christmas decorations will be drastically reduced so it should be very cheap for you to pick up some that you will want to use in making your own snowman. *Yes!*  I love a sale!

The supplies I have listed are not all necessary.  It just depends on what you want to do or add to your snowman.  I look often at Estate sales, auctions and garage sales and find most of my supplies.   
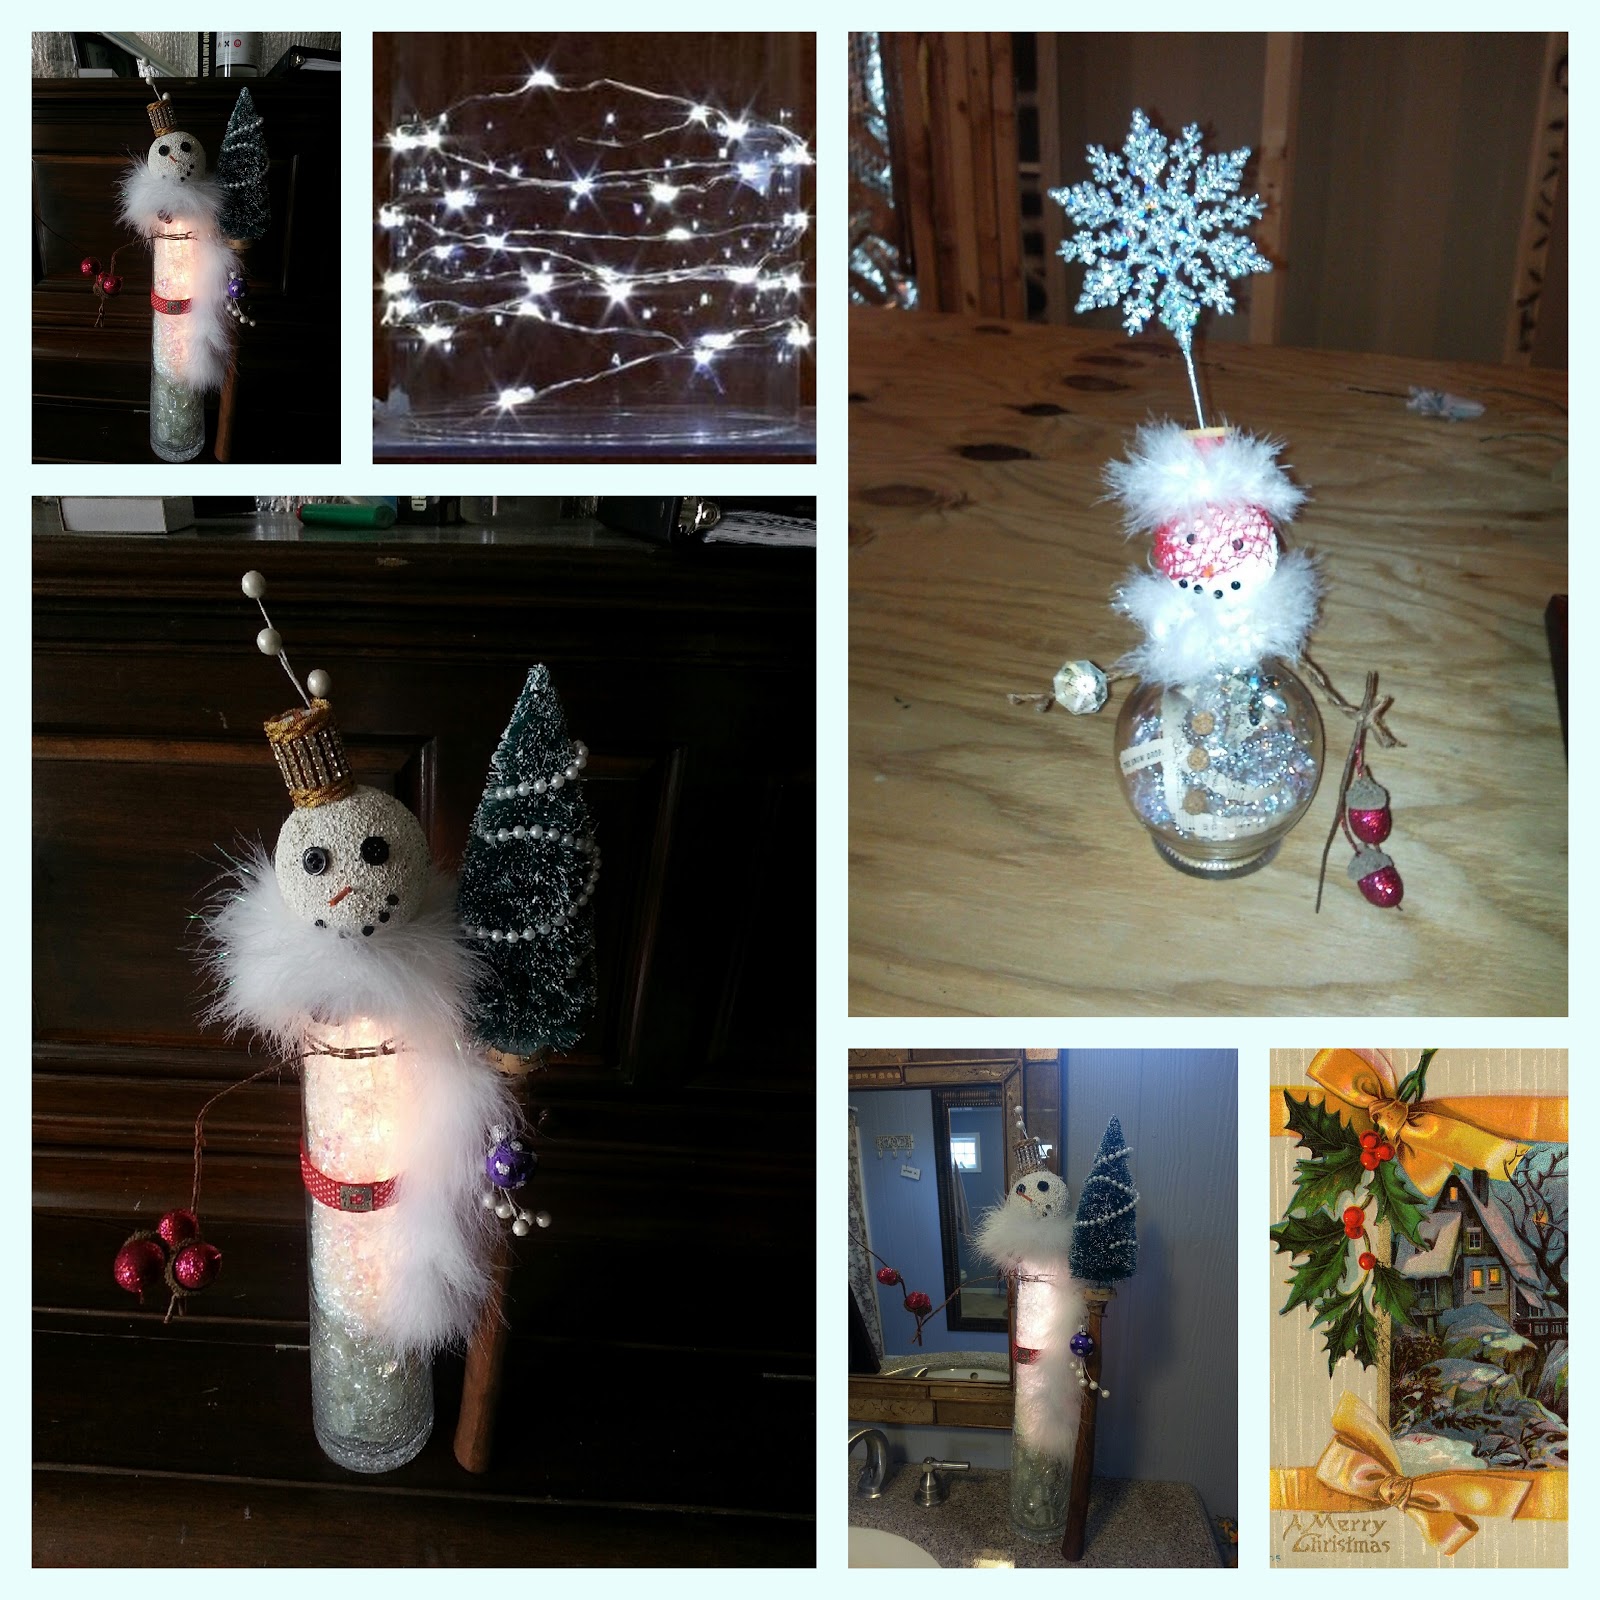
  • First thing you will need is a see through bottle or vase of some sort.  Usually one with a narrowing at the opening to allow a Styrofoam ball to sit on.  You can also use glass lamp globes.  Watch garage sales!  I got the tall, crackled vase above for a quarter!
  • Lights:  I use 36" 18 Light Silver Wire Cool White Battery Operated LED Micro Miniature Christmas Light String Set With Timer.  They will run on 4 AA batteries and will only be on for 6 hours at a time.  Any miniature lights should work, even if you need to plug them in.  Michael's, or Joanne's carry this brand and you can use their weekly coupons to get them 40-50% off. 
  • Hot glue gun & glue sticks
  • Scissors (decorative edge if you like)
  • wire cutters
  • Starch
  • Small Square Craft sticks in various colors (maybe 2" or under) I use these for the nose especially.
  • Package of Christmas Trees (from old bottle brushes- I found a pack at Big Lots for $6 that has a wide assortment of sizes and a dozen trees.)
  • Old Christmas book or hymnal
  • Glitter- I use silver and like to have it in square for the head.  I also use the tiny round for accenting other parts of the body.
  • Gesso White paint
  • Fake snow, or rock salt
  • Styrofoam balls- it will depend on your bottle size what size you need to purchase.  I find these often at Estate & garage sales. 
  • Christmas decorations:  snowflake garland or other small garland, picks (like the snowflake above), pearls, Christmas berries or other Christmas floral, tinsel, small glass ornaments, glass rocks or vase gems, etc.  ANYTHING that would look good either ON your snowman or IN your snowman. 
  • Feather Boas, faux fur, cotton batting, old junk ties, ribbon, etc.  Anything that can be used to accent your snowman by making shaws, scarfs, wraps, etc. 
  • Antique findings:  Old keys, lockets, knobs, wooden thread spools, vintage jewelry, corks, marbles, etc.  I even used an old hammer handle in my snowman pictured above...the tree is sitting on it.
  • decoupage glue
  • Buttons, nails or tacs for eyes & mouths.  White/ or pearl ball head straight pins.  Smaller ball black straight pins. 
  • Netting from anything.  The netting that looks like a bird cage veil is from a red craft supplies sacks that held glass gems.  But you can also find it on onions, apples, spices, etc.  Just keep your eyes peeled for netting and then SAVE it.  Examples above in white & red. (The white is hard to see in my photos but if you click on photo to enlarge it you will notice it on the finished snowman by the mirror) 
  • Old postcards.  I used the one shown above and decoupaged it to the back of an Amaretto liqueur bottle and it fit perfectly in the indention of the bottle.  The old writing shown through the glass and "fillings" and the back side was the pretty Christmas postcard picture.  You can also use them as the floor of a globe.  If your globe is wide then scan the postcard in and re-size it bigger to fit the base of your open glass globe and print on heavy card stock.  Then cut into the circle to close up the globe then fill as though it were a bottle.
  • White metal hangers.  I don't use these in all of my snowmen but if I fill them really full like the big one shown above, then I'll cut the hanger to fit inside the bottle and wrap the lights tightly around it and then insert it down among the fillings of paper & fake snow and tinsel. If you like, you can leave enough coming out of the bottle to poke into the base of the "head".
  • Natural Brown Vine Covered Wire for the arms.  Give them a very rustic appeal, wraps around your bottle nicely without needing glue and will hold items well (like hammer handle). 
Okay, I think we should be ready to start.  I begin by painting all the Styrofoam balls I will use.  I paint them with white gesso paint, coating well into the holes of the Styrofoam.  Then before the paint is dry I sprinkle them with silver glitter (usually square cut).  Don't overdue it, just a light dusting of glitter is good. 

While those are drying you can work on your snow "person" body.  Decide where the arms will go and wrap your wire and cut it to fit. Sometimes this is around the "neck" of the bottle and sometimes in the middle.  Examples in photos above. 

Most of my Snowmen come out as women.  (Snow women just does not have the same ring to it as Snowmen.)  I have a lot of vintage jewelry and I like to dress up the gals with a bird cage veil, rings, broaches, colorful hats,  feather boas, etc.  One of mine even carried a purse!  But you can make men of course too.  I have taken an old hymn book with a Christmas song and cut it into a spiral.  I layer this into the bottle carefully as old pages like to rip easily.  I have also cut out cute old song titles and decoupaged this to the front of the bottles.  You can make a man's top hat from old book pages.  You can also print out saying on plain computer paper and tea stain them too if you don't want to mess with an old book.  I would like one to say "She loves Christmas".  That will be my next design that I will decoupage to the bottle front. 

Just pack the inside of the body by layering up with your tinsel, garland, book page spiral, etc.  You can use the wire lights to help spiral all these things together and up to the top of the bottle. You can add the fake snow to the bottom of your bottle first if your not going to pack it full. (If it's packed as my taller snowman above is then the fake snow will not show unless you use a lot) If you are packing them full then you will want to wrap the lights on the hanger wire & then push it down into your packed body.   I use vase gems in  the bottom of larger vases or bottles.  It's a cheap filler for a bigger snowman.

Add your Styrofoam head by hot gluing or using the hanger and poke into the base of the "head".  Then poke in an orange stick for a nose.  No need to glue it.  I then poke in  black nail tacs for the eyes and mouths on smaller balls.   I only use them for the mouths on larger balls, otherwise the eyes look too small.  I use buttons for the eyes on larger balls,  held in by black straight ball pens. 

Next hide the join of the head & the body.  You can use the feather boas, old ties, jewelry, make a neck scarf, (starched like it's blowing in the wind)  florals or pine garland.   Get creative. 

Add embellishments to the body.  I have used cork buttons, jewelry, postcards, book pages, old keys, etc.  I have starched a shaw to wrap around the the back and over the arms and then sprinkled it with small glitter.  Whatever you like.  

Add embellishments to the branch arms.  Hold ornaments, Christmas florals, string lights between the two arms, hold a sign, a candle, whatever you can think of. 

Now fix a hat.  I have used old wooden spools, old jewelry (or both as big snowman above has rhinestones wrapped around a wooden spool).  You can use glass knobs, small Christmas trees.  Whatever you fancy! 

Use the straight pins to add the bird cage netting if you desire. 

Now you should be finished with your snowman.  I would love to see your creations.  Send me a link to your photos if you make one or more!  Also, let me know if anything looks confusing or if I have left out anything important that is not letting you move on.  Merry Christmas!

Sunday, November 11, 2012

Alcoholism

I am saddened by the amount of people in my life that are either
A) alcoholics
B) living with one
C) has a family member who is one
D) has a close friend who has A.B or C to deal with

Myself, I like to have a drink on occasion.  I enjoy mixed drinks or wine usually and it's fairly rare but I like the taste.  Never, every week or even month for that matter and I am not that person that drinks until I'm drunk.  I'm just more of a social drinker for parties or celebrations. 

Lately, I can't seem to enjoy those few "celebrations" because all I can think as I sip my glass is the ugliness held within that glass and the damage it is doing.   It's not "cheers" and happiness and laughter.  It's poverty, domestic violence, and tears.  I really am torn for those people that HAVE to have it.  The affects on the body are horrible, the money spent towards it can make a whole family lose everything, and the lost relationships just leave me at a loss for words.  I have seen so much destruction (past to present) within my family and with my friend's families and it makes me very sad.  I am heart broken at this very moment and so disappointed.

I read somewhere that alcoholics have no empathy.  The disease kills that and so they can't relate to your pain.  I don't know if that is true because a lot of these addicts can be very loving people at times.  I would say that is true at some stages.   I wish the ones I love could feel my pain right now.  Feel my worries.  I pray for them and those people closest to them! I pray that they come to their senses soon.  Before more regrets, ugliness, lost money and hurt people.  

There really is so much more to life.  It's easy to say when you are not an addict.  I try to go without sugar and it's really hard.  I struggle with my weight.  I can't imagine something like drugs or alcohol having total control over my life and the struggle to not want it, to not have it. 

 I pray for all those dealing with it in one way or another and I pray you get your life back.  The life you were meant to live.  Especially my loved ones.  Watch your anxieties disappear as you make it LEAVE YOUR LIFE and you beat your addictions.  

Thursday, November 1, 2012

Time Travel

I just finished watching Safety Not Guaranteed, a really great movie.  I highly recommend it and believe me, I watch a ton of movies.  This one is really great.  If it wasn't almost midnight I think I would watch it all over again.  It makes me think about time travel, among a whole host of other thoughts & feelings.  But really, the movie circles around the notion of time travel and then it dives deeper into why you would be willing to go if it was possible.

It got me to thinking, would there be anything I would go back for?  There is nothing really "cut & dry" in my life that instantly comes to my mind like in the movie.  There are moments and mistakes I wish were different in my life but then if I changed them, how would that change me now?  All my experiences, good or bad, have shaped me into the woman I am today.  Then I wonder are there moments that I could go back and change that would help someone else?  A path I crossed that hurt someone without my realizing until it was to late.  Yes, I'm sure of it.  Those moments may be worth a do-over. 

What about you?  I would love to hear your story in my comments if you would time travel and why.  Not just to "see" things (like dinosaurs and such) but to really make a difference, to prevent losing someone if you could, or to right a wrong. 

Wednesday, October 31, 2012

40% OFF Sale!

I'm cleaning out my Etsy store to make room for new creations!  Here is an example of what I've been working on.  Please visit my store & type in Simple40 for the coupon code & you will get 40% your total order!  There are antiques, vintage items, tiny bottles, jewelry, soldered glass charms, postcards & several other items you will not want to miss.  This sale is just in time for the holidays so get them before they are gone!

Monday, September 3, 2012

Please join me in my Etsy store SimpleSubtleties for a big HUGE sale!  25% off every single item in my store!!  I'm cleaning out and clearing out to make room for new creations.  It's a perfect time to do your holiday shopping too.  I have Halloween and Christmas charms available now plus a couple of LOT items that will be sold so cheap you can re-sale them in your own stores! Happy Shopping!

Friday, July 13, 2012

DIY Nautical Beach photo board

My friend asked me to design her something "beachy" to hang above her closet doors. 

This is what I came up with by using an old photo, photoshop, a $7 pine board, some white acrylic paint and $6 worth of cleats (3 total) purchased at The Bass Pro Shop, decoupage glue ( I used Modge Podge glossy), and photo hangers for the back $2.  

Total piece measures 9 1/16 inches tall and 62 1/2" inches long.  

Instructions:
First you have to buy your board and cut it to whatever size you are wanting.  Then "whitewash" the edges by using a thin, watery layer of white acrylic paint.  Only brush paint around the front sides of the board and then around all four edges as to not use unnecessary paint on the surface of the wood that will not be showing.  You will want the paint thin enough that some of the wood grain shows through. 

Next create your picture to go on the front.  You will need one that will look good cropped into a long narrow strip like this.  I chose this old beach photo (original, uncropped photo above) I purchased from an auction. 

In photoshop, (or another photo program) crop your photo a few inches smaller than the size of your board.  I cropped mine to 8 inches tall and 59 inches long.  Next find a font you like and add your lettering in a large size.  (Mine was 472 pt large, University High font and I chose a turquoise blue for the color) I wrote "Seas the Day".

Once all of this is done you will need to flatten your image in photoshop.  Then Save As and name it something to keep this banner style photo in case you mess up and have to start all over (like I did-only I didn't originally save it and had to start from square one!!) 

For your next step you will need to crop again so that you can print on 8 1/2" x 11 size copy paper with your printer.  Select crop and change your dimensions to 11" width (to get as much on a page as you can) and then the height will be whatever size your making so mine was 8 inches.  (Be sure and save each page with a new name so if you mess one page up you can reprint it & easily start fresh even if your on middle page or at the end during your decoupage phase) There is a grid you can use in PS but I just eye balled it since I could overlap if necessary when I decoupaged my photos to the board.  I ended up with 6 pages that I had to trim with a paper cutter and then mount to the board. 

Once pages are printed and trimmed arrange in order of placement and start with the 1st page.  Decoupage the back of the page AND decoupage the part of the board where it will be placed.  Now smooth it down to the board carefully to avoid rips or tears.  Copy paper is very thin and will tear easily with too much wiping.  A few small wrinkles will be okay, especially if your using a vintage photo like mine.  Do each page and allow to dry.  Then decoupage the entire front of the board to get a good smooth coat over all your picture. 

After it is dry it is time to add cleats or whatever you choose to use as decorative hangers.  I decided on 3 stainless steel cleats to give a more nautical appearance.  I measured my board, divided it in 2 and placed the middle cleat first so it would be centered.  (Since that spot was the middle of my letter "e" I decided to turn it horizontal and leave the other 2 vertical and I like that look much better than all three going the same direction)  I added the other 2 equal inches from the center to space them all apart equally.  I screwed them in, added some picture frame hangers to the back of the board (not pictured) and whalaaa, it's done! 

Very little cost and very little time involved, my favorite kind of projects!

Wednesday, June 27, 2012

I've been having fun on Pinterest.  I created a board called "My Bucket List".  I thought it would be fun to pin stuff that I would like to do someday.  It has been fun and it's no where near being done and hopefully I'll have LOTS of time to try to complete it. 

The thing is, working on it has really pointed out to me how much I have DONE with my life.  It's really amazing to stop and really consider.  I am so lucky to be so blessed. I am not wealthy or rich but to read this you would not know it... 

  • I have swam with the manatees
  • I have climbed Big Brutus' boom to the top
  • I have been to a drive in movie
  • Had an amazing first kiss
  • Seen the Atlantic and Pacific Ocean
  • Seen one of the great lakes
  • Been to 19 of the 50 states
  • Taken a cruise
  • Seen turquoise ocean and white sand beaches
  • Learned to scuba dive
  • I have toured the capital of the United States
  • Rode a horse
  • Lost my heart to a dog over and over again
  • Lost my heart to a cat if you can believe that
  • Found true love
  • Witnessed springtime waterfalls on Mt. Rainer
  • Vacationed with loved ones
  • Got married
  • Had a child
  • Raised a family
  • Had a sunset sailboat ride
  • Relaxed in a hammock
  • Watched my grandchild learn to walk
  • Learned to paint
  • Seen the view from an airplane
  • Rode rollercoasters
  • Had a picnic
  • Owned a home
  • Crowned once a queen and once a princess
  • sang karaoke
  • went canoeing
  • seen Hoover Dam
  • waded in a creek
  • went fishing
  • drank from a well
  • captured a moment with a photograph
I think of things all the time that I can keep adding to this list.  My mind just spins out the memories.

What would you call a list like this?  It's no longer a Bucket List, it never actually was...it's just LIFE happening and going by so quickly that pretty soon you realize it could be someone's Bucket List and you were just lucky enough to have lived it and remember it.

Maybe it should be called "My Amazing Life List".  Start one today and see if it doesn't suddenly become longer than your Bucket List.

Monday, June 4, 2012

This is my cute little grandson holding the earrings he helped me make for his mommy for Mother's Day.  I soldered green stained glass and then we used Staz on ink in white to stamp his little fingerprint on them.  Embellished with a cross and used jumprings to add them to a earring post.  Too cute!  She loved them and he was so cute giving them to her! 

 I did finally do a painting.  I painted a 5x7 picture of my friend Donna.  I used India ink and water for most of it to get the silhouette look, then a tiny bit of watercolor on the lips and necklace to set it off.  I then sewed it to an 8x10 mat and embellished with a bow.   She loves to dance so I wrote up the sides "and if the music is good, you dance"

Sunday, June 3, 2012

A "refreshing" way to store beads!

I am one of those people that hate to throw out anything and always thinking of what else "it could become".  When I finished my Tic Tacs the other day I had a AH HA moment and decided they would be ideal to store my beads.  Maybe it was this beaded mess in my art room that brought me to it!  I didn't bother to take the labels off, although you could.  I taped my bead description and price to the tops so that when I do sell something I've made with them I'll know how much to figure in for the item price. 

I've asked all my friends to save me their Tic Tac containers.  So far I only have two.  I  think they will work great so I wanted to share my idea.  They will be easy to see what bead and color are inside each container and I don't have to worry about beads running all over the table and onto the floor where my little grand dog Ruby will gobble them up.  That wouldn't be good for either of us!

Monday, March 12, 2012

watercolor

Today I'm going to watercolor something.  I did a watercolor search on Pinterest and found some really inspiring ideas.  I have a partial painting started so maybe I'll even just finish it.  In the meantime I've been taking more Ruby pictures.  She may be headed to Alaska in May so here is her latest photo.

Monday, February 27, 2012

Saturday, February 11, 2012

Party Idea

My son and his wife moved to Alaska on Sunday so I threw them a Bon Voyage Party.  I thought this was a great idea and I wanted to share it.  (You could really do it for about any theme and for any type party).  I googled Alaska photos and hit Images so all that came up were thumbnails.  Then I printed them.  Came to 10 pages with about 25 per page, give or take a few.  You cut out the one's you really like and glue them together with a toothpick in the middle.  This gives you a photo for the front and back and you just poke them into cup cakes, cake or whatever else you can create.

Please share with a link to my blog and happy partying! 

Wednesday, February 8, 2012

It's been awhile

I admit, I have been in Blogger depression.  Last year was a TOUGH year to say the least.  It had it's grand moments but it was filled with a lot of personal heartache as well.  Change is hard and things changed in 2011. 

Just as a recap,  I quit my job of 18 years to help de-stress my life.  It was a very hard decision but one I have not regretted.  I now work for a smaller veterinary hospital that is closer to my home, less hours and much less stress!  My last job did throw me the greatest going away part ever. The theme was "anything but a going away party".  It was really fun and something I will never forget.

I lost two pets last year.  Both were almost to the age of 18!  My little cat Missy and my dog Valentine.  Valentine's pictures have been all over this blog and so it made it especially difficult to want to post anything without really feeling sad.  Time has a way of healing a heart that is amazing, that's all I will say about that.

My step brother took his life last year.   I can't even describe the pain that caused my family.  The question why? still remains on my lips every time of think of it.  Such a waste of a wonderful life.  He was an amazing person with so much life left to live and so much to live for.  I think suicide is so hard to understand.  I wish we could of helped him through the darkness in which he was living.  His two teenage kids need prayers now and always to help them endure "this" forever. 

My oldest son got married and I LOVE my daughter in law.  I have prayed for her since my son was little.  I heard Dr. Randy Carlson talk of doing that- praying for your future daughter/son in laws & I'm so glad I did! They just moved to Alaska for jobs!  wow.  I have kept their little dog Ruby for them until they can take her or until they return.  She has been so much fun (although my cat Ali would disagree!)  She is a good poser too.  Her is a recent picture I took of her.  Isn't she a beauty?   You know how they say the first year of marriage is paper and the 2nd cotton and so on up to 25 is silver and 50 is gold.  Well, if you have a dog you can have your Poochie years, Buddy years, your Duke years and your Valentine years and your Ruby years.  Don't they sound like happy years? How could a marriage ever go wrong if you look it dog-wise?!

Here is hoping I can do a much better job with this blog of mine in 2012.  Thanks for visiting & God Bless! 

Sunday, January 1, 2012

Another New Year

It has been a really long time since I posted anything to my blog.  I have to admit, with Facebook, Etsy and now Pinterest I find it hard to devote alot of time here.  But lately I have been thinking deep thoughts and feeling like writing them down.  That does not mean I'll get to all that today but I'm breaking the ice with you since I have ignored you for so long....my poor, suffering little blog. 

I should recap 2011.  It was a year of many changes in my life.  My oldest son married a wonderful girl and moved to Texas.  My little dog Valentine, whom you will find ALL OVER this blog passed away.  She would of been 18 years old this month and I miss her everyday.  I also lost my little old cat Missy.  She would of been 18 in August but she died before that.  I have been blessed with pets that lived very long lives.  I have one male cat now at home and he is 13 already!  Time flies!  I'm glad he is here or this house would seem really empty right now.  I switched jobs in June and now work 5 minutes from home.  I'm still a RVT but only part time now.  I'm much more relaxed and happier...my husband even agrees!  Sometimes you have to make those really hard changes in your life to find some peace and happiness.  I was to stressed and working to hard.  Now I'm hardly working!  ha.  True story.  We traveled a bit in 2011.  We went to Washington D.C., Texas, and Alabama.  All fun trips!  I LOVE to travel.  I did lose a family member to suicide and I was greatly saddened by it.   It's a difficult thing for the whole family to comprehend.